Posted on Leave a comment

Wine Racks

You have put more joy in my heart than they have when their grain and wine abound. – Psalms 4:7.

This last Christmas my folks picked up a wine kit for my wife. Right after the New Year she started a pinot noir blueberry. Last month she wound up with 29 bottles! It seemed like it would be a good idea to make some wine racks to give her a way to display her wine.

I started by going through the stack of wood in the machine room looking for some pieces I could get some clear sections out. I used the miter saw to cut out the knots. Those pieces were then face jointed and then planed to about 3/4″ thickness. Then a single edge was jointed so I had a good edge to run on the table saw for ripping to width. I ripped the main piece about a half inch wider than the bottles Elizabeth had used for her wine.
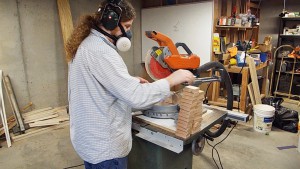
Stacked Components
Components for the Wine Racks stacked next to the miter saw.

The wine rack is composed of 3 basic components, a wide trapezoid which would have the hole for the bottles, parallelogram pieces which would offset the bottle holders, and then smaller trapezoids which would be the tip and bottom of the rack. On the miter saw I set the angle to 22.5º. A stop block was setup for the for each of the cuts. I did all the cuts for each of the pieces batched together and would reset the block for the next piece.

I did some research and the only consensus I could find was that the cork needed to be wet. Some folks suggested a 5º incline was necessary for optimal and other that minimizing the surface area to reduce oxidization. Though I think most of that is some wine snobbery poking through in the guise of science. I figured a horizontal orientation was going to be sufficient.
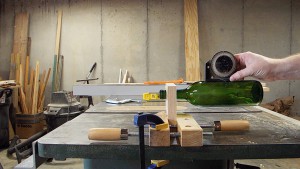
Bottle Horizontal
The bottle is horizontal after the hole has been drilled at 16º.

I then had to figure out the logistics of holding the wine bottle. A little trial and error found that a 16º was required to get the bottle level with the properly sized hole. This was done by finding that the bottle was roughly off by that amount when I drilled the hole at 90º. To verify this I used a temporary jig to drill at 16º. When that checked out I made a permanent jig which mated with the same 22.5º angle which the cuts would wind up being at. I was able to batch off each of the bottle holders at the drill press.
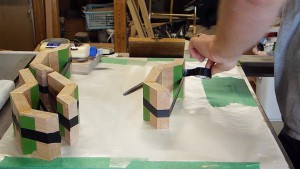
Glue Up with Tape
Glue up using the miter tape technique and electric tape as the clamping pressure.

I used the tape technique which is used to glue up miters, putting tape on the outside of the joint and adding glue. Then the joint is pulled together, which I used some electrical tape. The tape had enough stretch to it to provide enough clamping power. Though the glue up was slow going since I had to only do a single joint at a time, since each joint pulled the opposite direction.

Since all the joints were effectively butt joints I figured splines were necessary to reinforce the joints. I ripped some walnut down to about a 1/4″ for material to use as splines. I then took a measurement off the spline material and setup the dado stack to be just shy of that measurement. This allowed me to finesse the splines to exactly the right size on the belt sander. Glue was applied inside the dados and the splines were slid in. Using cauls each spline was clamped.
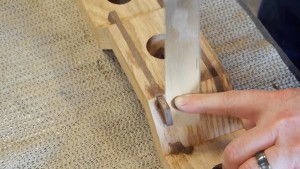
Splines
The splines having their ends removed after being planed flat.
Once the glue was dry I used a block plane to bring the splines flush with the rest of the rack. A flush cut saw was used to trim the ends of the splines to the surface of the angled pieces of the rack. At that point the rest of this part of the rack was sanding. The palm sander was used for the most part, but a certain amount was necessary to do with hand sanding. I used the smallest drum from my drill press drum sander to cleanup the holes for the wine bottles.

The backs were a simple glue up of oak with a couple walnut slats. These were then face jointed and planed to thickness of about 3/8″. These were then squared up on both ends, about a 1/2″ larger in each dimension of the rack component. Then the ends were partially trimmed to the same angle as the top and bottom of the rack at 22.5º.

The racks were attached to the backs by pre-drilling the back and recess. These were clamped onto the rack and the rack itself was pre-drilled to keep it from splitting when the screws were attached. The 1/2″ forstner bit was missing so I used a 1/2″ brad tip bit to put a recess on the face which will get plugged by some 1/2″ walnut dowel once mounted on the wall.

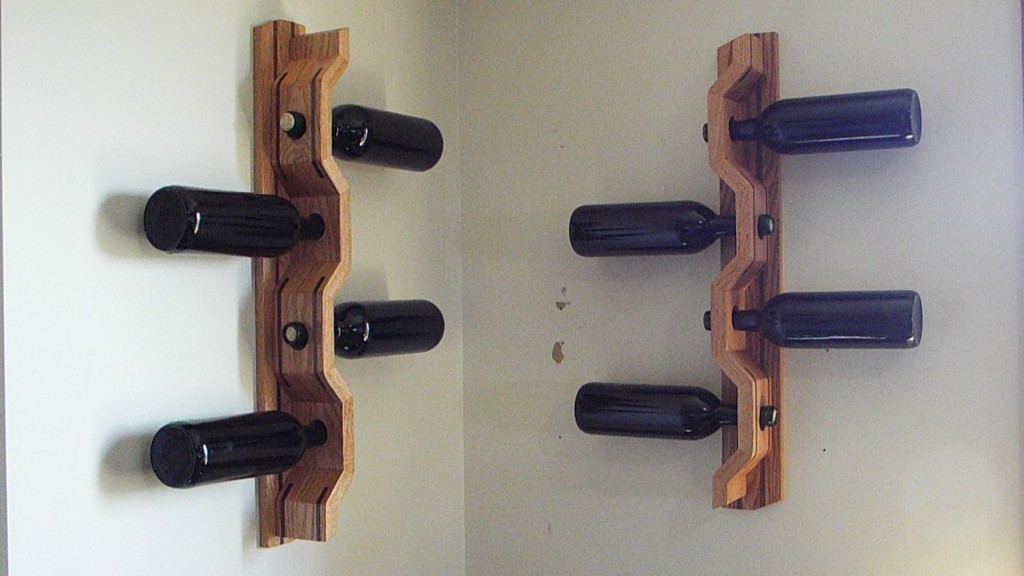
Finally a finish of shellac was applied after wiping the whole thing down with a microfiber cloth to remove the dust. A few coats of shellac with some sanding before the last coat gives it a nice amber finish which looks good on oak and walnut. The completed project is shown below.
Wine Racks
Completed wine racks loaded up on the wall.

Music Links
http://freemusicarchive.org/music/Jahzzar/
Posted on Leave a comment

Recurve Bow

For not in my bow do I trust, nor can my sword save me. But you have saved us from our foes and have put to shame those who hate us. – Psalm 44:6-7

Dominic Bender on Youtube issued a challenge he called, “The Challenge Tree.” The basic premise is that the woodworker would grab some log or live edge piece of wood which was not taller than the participant and such that they could carry it, and then make something with it. As far as challenges go, it seemed pretty simple to keep within the guidelines and spirt of it.

The last couple years we’ve been leasing out some of our property to a local farmer. And on that land there is a small stand of poplar tree which we affectionally call the “Quarter Acre Wood” a la Winnie The Pooh. The farmer cleared a couple of the smaller trees around the stand digging them up and pushing them into the others. I found one that seemed like it would be large enough to get the material I needed from and cut it down and moved it to the basement to thaw for the night.

It took some doing, but with a reciprocating saw, duct tape, and a couple more or less dangerous cuts I managed to get the root bundle off the tree. The log was then cut in half into about 3′ sections. I processed both on the jointer to create two square and flat edges. With one I ripped thin slats for the limb lamination and the other I ripped another parallel edge for the stave of the bow.

The profile of the stave was drawn onto one of the sides and the face was drawn onto the back. Then I used the bandsaw to rough out the profile saving the off cuts as I went. The off cuts were then taped back onto the log and it was turned 90º to cut the face of the stave on the bandsaw. The next step was to use rasps and files to do the basic shaping. The handle and arrow support was where most of the work was done and everything was just rounded over some. I then sanded the rough marks with some high grit sand paper and worked up through to 220 grit sand paper.

To do bent lamination I needed a form. I cut some scrap plywood down to equal sizes which would hold the laminations. The plywood sheets were then laminated up with glue and clamps. I traced the shape of a limb on the form and brought it over to the bandsaw. When the form was cut I took two passes, one along the top line and the second cut along the bottom line. This allowed the form to handle the thicker bottom of the limb. I then sanded the insides of the form and taped some padding on each side of the form.

The slats for the limbs were pretty rough when they came off the bandsaw. I used a block plane to take out the highest spots and bring them close to flat. The jack plane was used to create a smooth taper of 3mm to 1mm along the length of the slat. I mixed the epoxy and applied it to both sides of the slats for 3 slats. Once sandwiched together I pressed them into the form with clamps and tightened them down with additional clamps. After two days the forms were released and I drew the shape of the limb and brought it over to the bandsaw. A couple quick cuts and I had the basic rough shape of the limb. Two were clamped together and a block plane was used to bring them both to the same shape. I then sanded the limbs remove any sharp edges and make them flex more evenly, so as to not twist.

I used a forstner bit to make a smooth spot for the flange nut, which would be used to secure the limbs on the stave. I had to then widen the first 3/8″ with another drill bit for the barrel of the flange nut. Next the hole was bored for the shaft of the of the bolt which would hole the limb. The final part of the operation was to duct tape the limb in place while drilling the holes through the limb.

I attached each limb separately one at a time. One issue became apparent with the flange nut and bolt I was using. The nut would keep spinning, despite the tightness around of the nut in the wood and I planned in the future I would epoxy that in place to keep it from spinning. However, when I was testing the limb for flex I found another fatal flaw. The limb just snapped beyond a point. Investigation found that it was along a knot in one of the plys in the limb. I used the last remaining slat that I had, which had originally been rejected, to attempt a replacement limb. The replacement limb suffered the same fate as the original.

Lessons learned: poplar is far too weak of a wood to use for bow limbs. Knots are incredibly weak compared to straight grain.

Links
Dominic Bender’s Challenge Tree Playlist

Music Links
http://freemusicarchive.org/music/Jahzzar/
Posted on 1 Comment

Piggy Banks

A little while back while visiting the in-laws my daughter found a penny or nickel while exploring the house. Grandma, ever so kind, told her she could keep the coin. The next day around dinner time I offered her a nickel to clear the dining room table before dinner which she sort of figured out how to do. When she was done I offered, “Great, now you can go put this nickel with the coin grandma gave you yesterday.” And she sadly replied, “I lost that one.” “Well, we’re going to have to do something about that then.”

I remembered back a while on another visit to the in-laws we came across my wife’s old piggy bank. It was a teddy bear shape with the body section hollowed out and a piece of plexiglass screwed onto each side. Over all it would be a simple project which had some distinct aspects which would allow me to bring the kids into the shop. I figured it was time to invite them into the shop and introduce them to one of daddy’s hobbies. Especially after the excitement the half lap poster frame project recently.

The first step of the project was to have the kids help me find the pictures they wanted to use for the shape for their respective piggy banks. Ethan loves two things: the letter Q and trains. Figuring there wasn’t going to be a way to get the Q to stand up on it’s own I figured it best to go with trains. And Seraphina loves, well, all things girly. And butterflies happened to be on my mind when looking for things girly so she helped pick the one we used.

The next step brought me into the shop by myself to find some wood which would support the size of the pictures I had printed out. I still had some 1 1/2″ material reclaimed from a remodel my folks did on their place by Hubbard Lake. An many of the pieces were quite wide. What I didn’t know until later was that the piece I chose had some severe checking which required some glueing and clamping to put back together. A quick bit of spray adhesive and the templates were on the chunks of wood selected. I then took the blanks over to the drill press and put some interior holes which I would cut between when cutting out the bulk of the material.

This was the first project I extensively used the new scroll saw from my folks for Christmas. It is probably not the ideal use since I was going through 1 1/2″ material, but it was better than a previous attempt with a bandsaw since it didn’t leave a cut the width of the kerf that had to be clamped and glued shut. Seraphina seemed to enjoy watching the work at first from a stool, but after a while the noise got too much and I had to finish it up all by my lonesome. Unfortunately due to battery issues the segment with Ethan was lost. Much of the sanding video was also lost due to the same battery issues (but no one wants to watch that anyway).

Some glue was used here to reattach a piece which had split due to checking. I used grain filler to plug up some of the holes in the grain and checking. This also works nice for any flaws and in general just makes the final result much smoother. Hand sanding smoothes things out enough and since there will be several coats of paint over the whole project.

Piggy banks need coin slots so I took each bank over to the drill press. On the train I drilled out the smoke stack wide enough for the coins to slide down, just like if I were to create a mortise. Then using a hand drill, chisel, file, and sand paper the throat of the slot was cleaned up and smoothed out. The butterfly was much easier since the slot was only as thick as the wall of the bank. The same technique was used as before, but much more quickly.

The next step was to trace out the shapes on the plexiglass I was going to use for the sides. On the butterfly I did the inside and outside. On the train it was just the inside. In retrospect using a sharpie was a bad plan, as later the lines wound up showing through the paint and finish. I used the scroll saw to cut out the shapes which was less effective as you would expect. I only had very fine tooth scroll saw blades which seemed to warm up the plexiglass as I was cutting and weld it back together after the cut. When I was careful I could break off the cuts, but I still needed to run the edges over the sander or bandsaw to clean them up.

I put a couple coats of black paint on the train (trains are black, right?) and a couple coats of white on the butterfly. I brought in the expert painters. Seraphina did a great job. She started making everything symmetrical across the butterfly. Though right at the end she took some artistic license and broke the symmetry. Ethan, well, he probably made the red door the Mick Jagger wanted painted black. So he ever so carefully globbed the red paint ever so artistically all over the train. I suppose I should have anticipated that, but if I had painted it red he’d have had nothing to do. We also had a small disagreement of the proper use for gloves which I lost. Later I put a couple coats of lacquer on each of the bank. Though that caused the sharpie line to show through, I suppose something in the thinner in the lacquer did that.

The final step for the project was the align the plexiglass on the sides of the banks. I taped them down and pre-drilled the plexiglass with a bit wide enough so that even the screw threads would pass through, otherwise the plexiglass would shatter when putting the screws in. Then I followed up with a narrower bit where the threads would engage in the wood. On the train bank I used a countersink bit to open up for the wood screw heads. And then the sides were screwed on and a couple coins put into each of the banks for the kids.

One of the issues I’ve been running into for each of the videos is the limited battery life of the camera I was using, a Coolpix 6300. The issue comes from the use of the battery, which is specific to the camera and I couldn’t find a charger other than the camera itself. Towards the end I was getting less than 45 minutes on one battery and 2 minutes on the other battery. So there was a ton of down time or missed video. The quality of the video was great, but the lack of battery life just made it unusable. The Fuji Film S8200 just arrived this weekend which uses AA batteries. The video quality seems a little less in the lower light shots, but it has a couple advantages. The primary being availability of batteries and chargers. It also can record in stereo, which I am not sure is a big feature. The second is the 40x zoom, which probably won’t come into play too often in project videos. A drawback is the failure of the engineers to allow the removal of the batteries and memory card while the mount is screwed into the bottom of the camera.

Music Links
http://freemusicarchive.org/music/Jahzzar/

Posted on Leave a comment

Through Half Lap Poster Frames

But when Jesus saw it, he was indignant and said to them, “Let the children come to me; do not hinder them, for to such belongs the kingdom of God.” – Mark 10:14

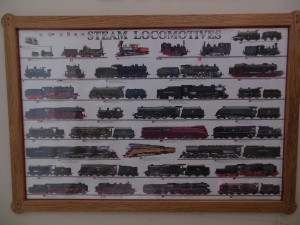
This story starts an embarrassingly long time ago. Back in the summer of 2013 my folks were watching the kids up by their place by Lake Hubbard. My wife and I scooted over to Traverse City for a couple days and we stopped at the model train store downtown and found a poster with a number of steam engines on it. I had the intention of building a poster frame for my son at the earliest possible point in time. Thankfully this Christmas our daughter also got a Frozen poster from my folks. And the earliest possible time suddenly appeared.

The video above goes through the build processes in a fair bit of depth describing the build process for each of the poster frames, so much of this is going to be recap of the video.

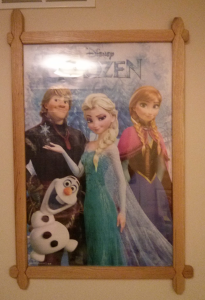
Frozen Poster Frame
Frozen Poster Frame
The Frozen poster frame was fairly fluid in the build process. At the start I wasn’t quite sure how things would work out and each step was mostly experimental, though in the end it came out to be a decent enough project to hang in my daughter’s room (which is to say not museum quality). Though she still seems to enjoy the poster a lot.

All I knew at the beginning of the project is that I wanted to use through half lap joints for the frame. I had seen some recently, though I don’t recall where exactly, and really liked the idea. I also figured for something like a poster frame it might be stressing the strength of miter joints. I wanted to keep the design for a Frozen poster to seem something of a crystalline inspired shape which meant avoiding curves and keeping with a cooler palette. In the selection process for the wood I looked for some of the lightest red oak I had on hand and with less of the characteristic crowns usually found in oak species.

I came up with a simple design for the joints to appear as if a half diamond from the horizontal pieces were occluding the vertical pieces. This was done by removing that shape from the vertical pieces first, smoothing out the cuts, and removing the material for the top piece of the half lap joint. Then the actual upper piece was used to scribe the lines on the horizontal pieces so I would have something very close to match. In the end my skills with a handsaw, chisel, and file were not up to the task of making this joint as tight as I would have liked to have seen. But rather than call it a loss, I deepened the chamfer along the joint to add shadow in the joint so that the less than stellar joinery became less obvious. Additionally it seemed at that point that going for a less perfect frame might also mean leaving the random lengths of the pieces and just adding their own angled cuts on each. Almost snowflake like in appearance, as each one is unique.

Train Poster Frame
Train Poster Frame
My son’s train poster frame was the second of the poster frames to be completed. I wanted the same basic idea of through half laps for the joints, but to do a different shape. Since strains have wheels and the giant barrels on the engine it seemed something circular would be a nice option.

Originally I thought this was going to be a tougher, but in the end it was much easier and the joints themselves were much tighter. I’m not sure if that is mostly do to some process changes (from experience with the first poster) which made it easier to do better joints or if it was easier due to a slightly different set of tools being used. I had originally planned on using a forstner bit to hog out the curves, but found it it was going to be tough to make it repeatable. Once I thought of using the spindle sander for the drill press I had decided to use the bandsaw to hog out the material. The working of the joining pieces went a little better by hogging out extra material with the dado stack and then using a chisel and file. Since most of the work was done by the table saw it was just detail work on the joint instead of doing all of the work. That allowed for finer adjustment of the joint compared to the more aggressive work that I had done on the Frozen poster frame.

Perhaps one of the hardest parts of this build came after completing the poster frames. I found I had 45Gb of video sitting on the fileserver and enormous chunks of missing video (such as the completion of the Frozen poster frame). In the end I figure I spent about the same amount of time on the video as I spend on the project. This was the first video I actually explained what I was working on with a voice over rather than just stringing clips together and adding music. The whole process of sorting the video, recording audio, and finally pacing the video clips took a considerable amount of time. I am impressed with the rate at which some other content producers are able to put videos out. I suppose some of that comes with experience.

Music Links
http://freemusicarchive.org/music/Josh_Woodward/
http://freemusicarchive.org/music/Jahzzar/