Posted on 1 Comment

Local Sourced Wood

Between my wife and I our need for wood to turn is pretty insatiable.  Since we live on farmland with only a small area we lovingly refer to as the Quarter Acre Wood which is mostly weed trees we need a source of wood to keep up our hobby.  We can buy wood commercially or at retail, which has the advantage of some exotics, or species available in other regions of the country, or figured woods.  Prices tend to reflect the potential beauty of the blanks though and would quickly bankrupt us or diminish our opportunity to turn.  Our preferred method to acquire wood is to keep an eye out locally for trees which have come down and make an offer to the the owner of the property.  Our deal basically is that we will pick out pieces some of the tree that we are interested in and the first item we turn from the wood is returned as a reminder of the tree to the person who owned the property.

Harvesting

I want to go into detail about what the property owner can expect. I will usually show up with my vehicle with either a hitch carrier or a trailer, depending on how much wood I think I might collect. The first order is to scout the area around the tree to determine if I can safely work on the tree. That means anything entangled with power lines, uneven ground, or other dangerous settings are out. If it is safe I will then consider the tree including species, size, figure, and other aspects which I will go into detail below. If everything looks good on my end I will let the property owner know and what to expect. Specifically all children need to be safely away from the work site and any adults need to be aware and careful while I am working. Since my goal is to just acquire the wood that would be suitable for turning I do not take the whole tree. While I may do some de-limbing to get into a safe position for a cut I am not processing the whole tree into firewood. In the end I usually grab a couple larger 4′ – 6′ section of the trunk and possibly a couple crotch pieces. That will typically leave plenty of usable wood for any firewood scroungers to still be interested in the remaining wood.

Interesting Wood

So how do you know if a tree is something that I might be interested in? Well, there are a number of criteria I mentioned above which I mentioned which were species, size, features, and figure. I will cover a few other less commonly seen characteristics which might also pique my interest.

Species

The species of wood is one the type of tree. For woodturning hardwoods (think deciduous trees) are best where softwoods (evergreens) tend not to turn very well. Unless there is something specific about a softwood tree I are not going to be interested. With hardwoods there is a great variety of species which are good candidates for turning. The most common ones are listed below, but if I haven’t turned it before I am usually willing to give it a try.

  • Cherry
  • Maple
  • Walnut
  • Birch

Some of the less pleasant hardwoods to turn are stringy hardwoods. In general these do not turn well, are hard on the tools, or have a tendency to check or crack in unexpected ways. That isn’t to say I won’t be interested if there is some other interesting aspect, but I will quite often pass over these species.

  • Oaks
  • Ash

Size

There are two aspects to size which are important to a wood turner. The obvious is the diameter of the tree, but the other less obvious and cause of most wasted trips is length. In general I am looking for trunks which are a minimum of 10″ in diameter. Anything less and the resulting bowl is just going to be too small. I might pick up a couple branches which are smaller than 10″, but those usually have specific purposes.

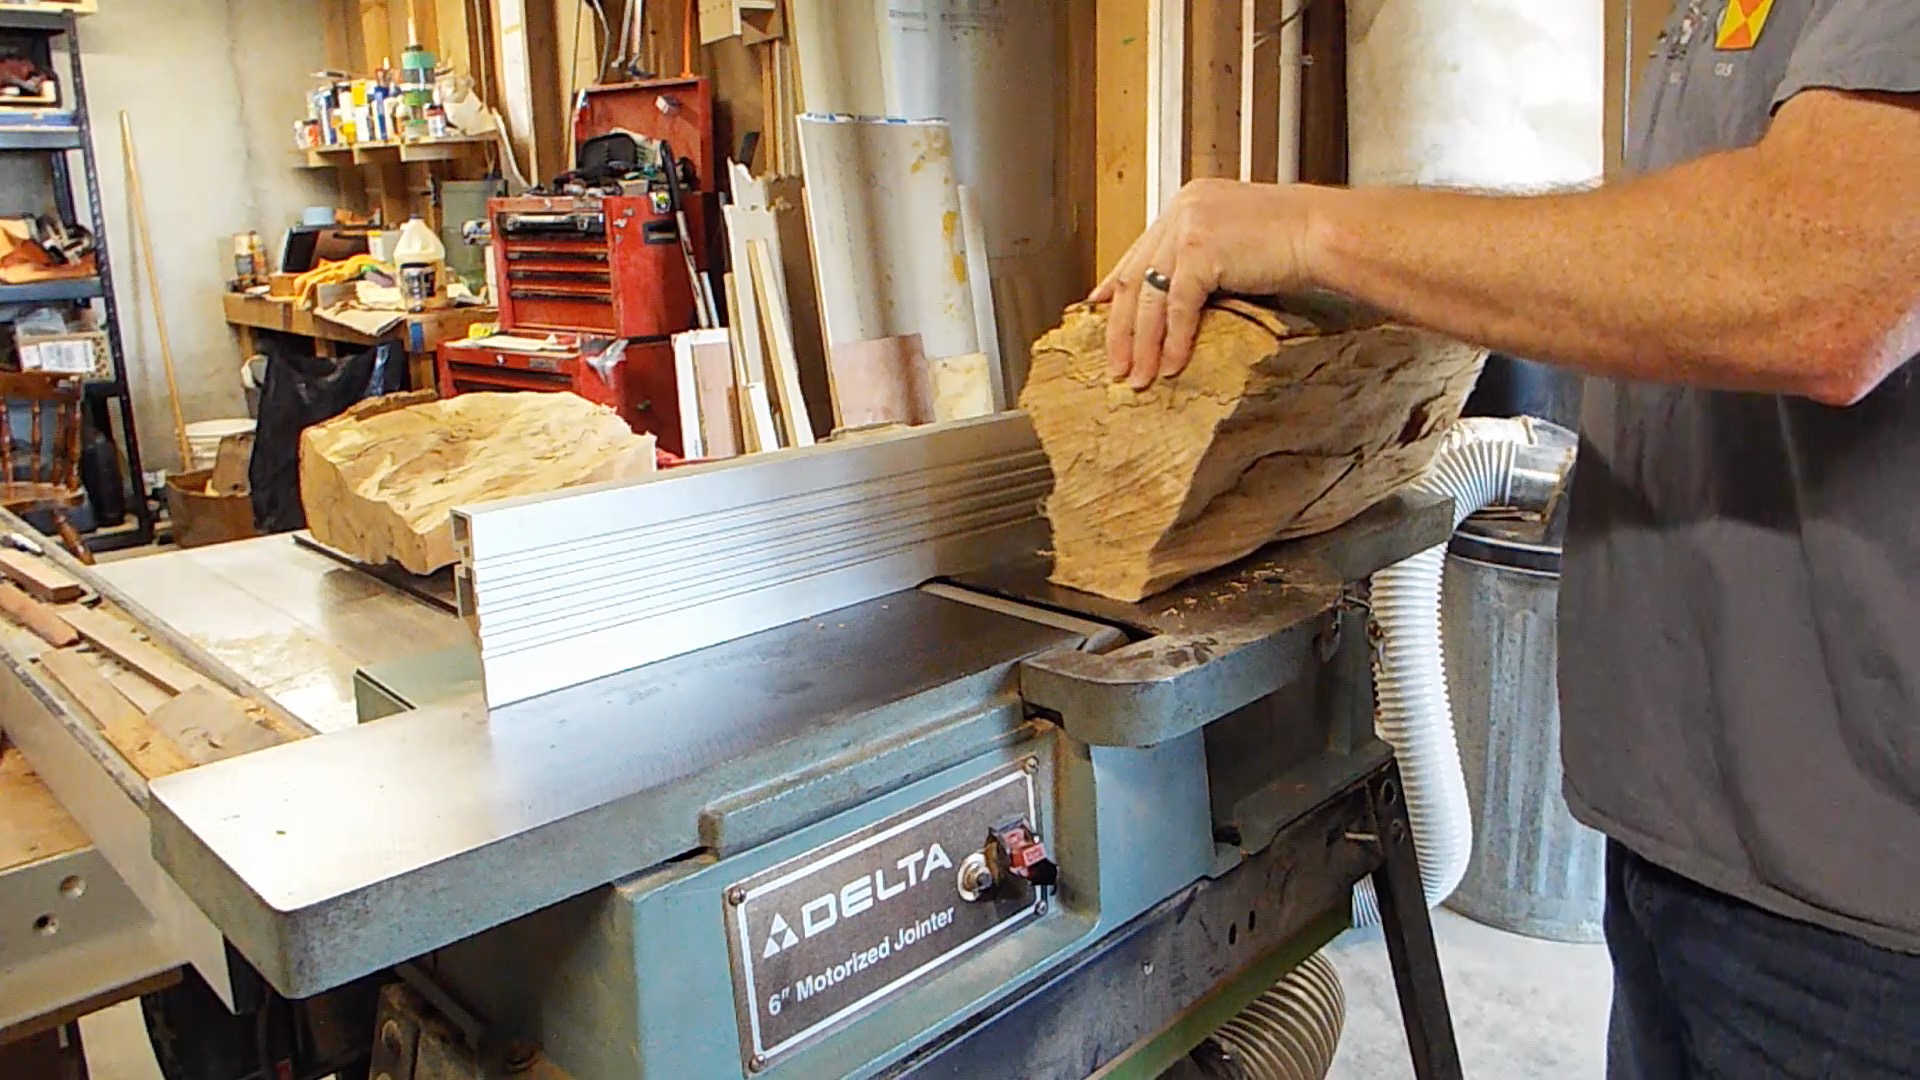
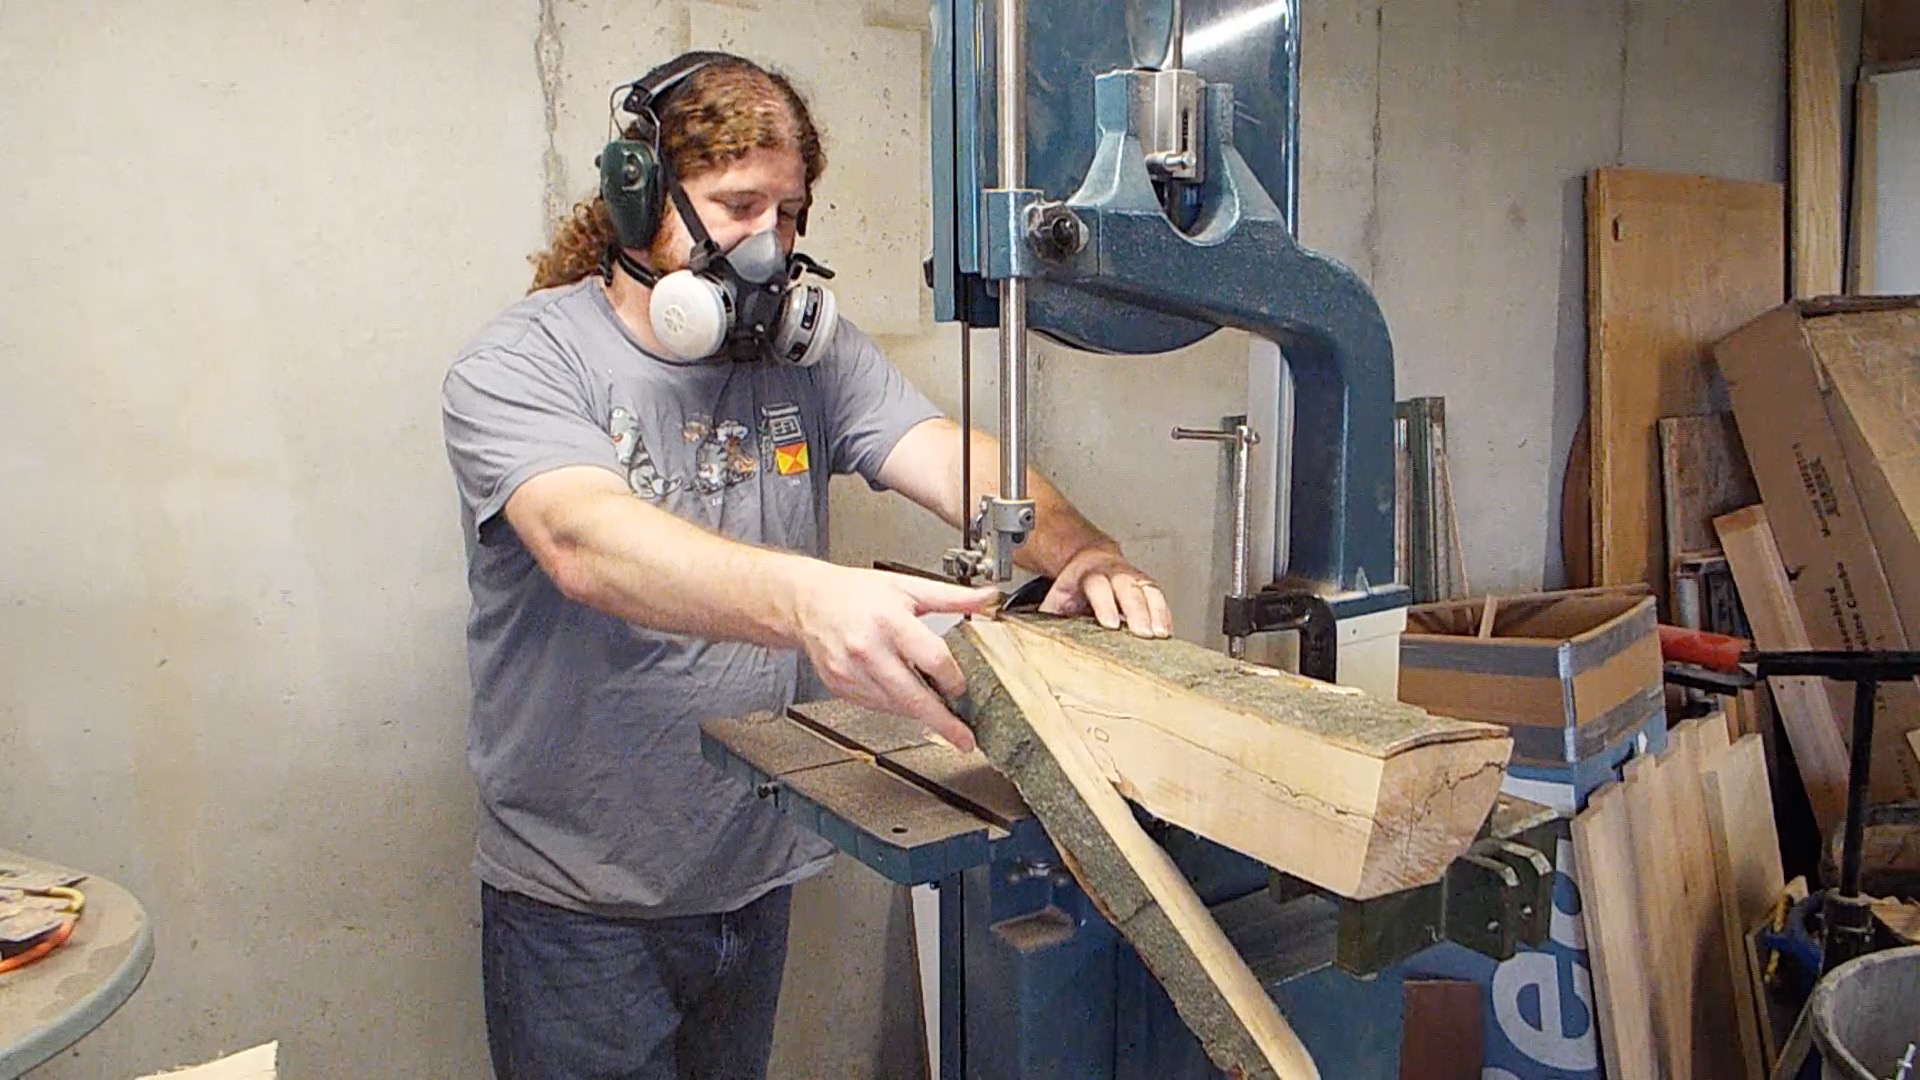
The length is the biggest problem that I run into when going to check out a tree. Quite often the property owner has already cut the trunk into firewood length. While part of my processing of the trunk section does include this step, unless I am on site within hours of those cuts the wood already begins to dry and check on those short sections, which pretty much destroys the wood for turning purposes. I’ve included a video below explaining the process I use to prepare bowl blanks which covers some of my process.

Features and Figure

There are several types of figure which I am looking for when acquiring wood for bowls, vases, or hollow forms. Some of the features are quite apparent when looking at the tree where others are not visible until you actually get into the wood.

Burls

Burls are usually “ugly” knobs or bumps hanging off of a tree. A common cause for burls is insect or other types of damage when the tree is younger. The tree grows around that damage and causes unusual growth around the area where the grain direction changes in irregular patterns. This can produce a very pretty bowl when turned to display the effect.

Crotch

Pretty much every tree has branches, but a crotch is where the trunk splits into two. An ideal crotch for turning is where both of the divided trunks grow to similar sizes. These pieces are very desirable when it comes to woods like walnut which feather the grain through the center of the crotch. One of my favorite bowls I’ve turned was a walnut crotch which I turned into a heart shaped bowl.
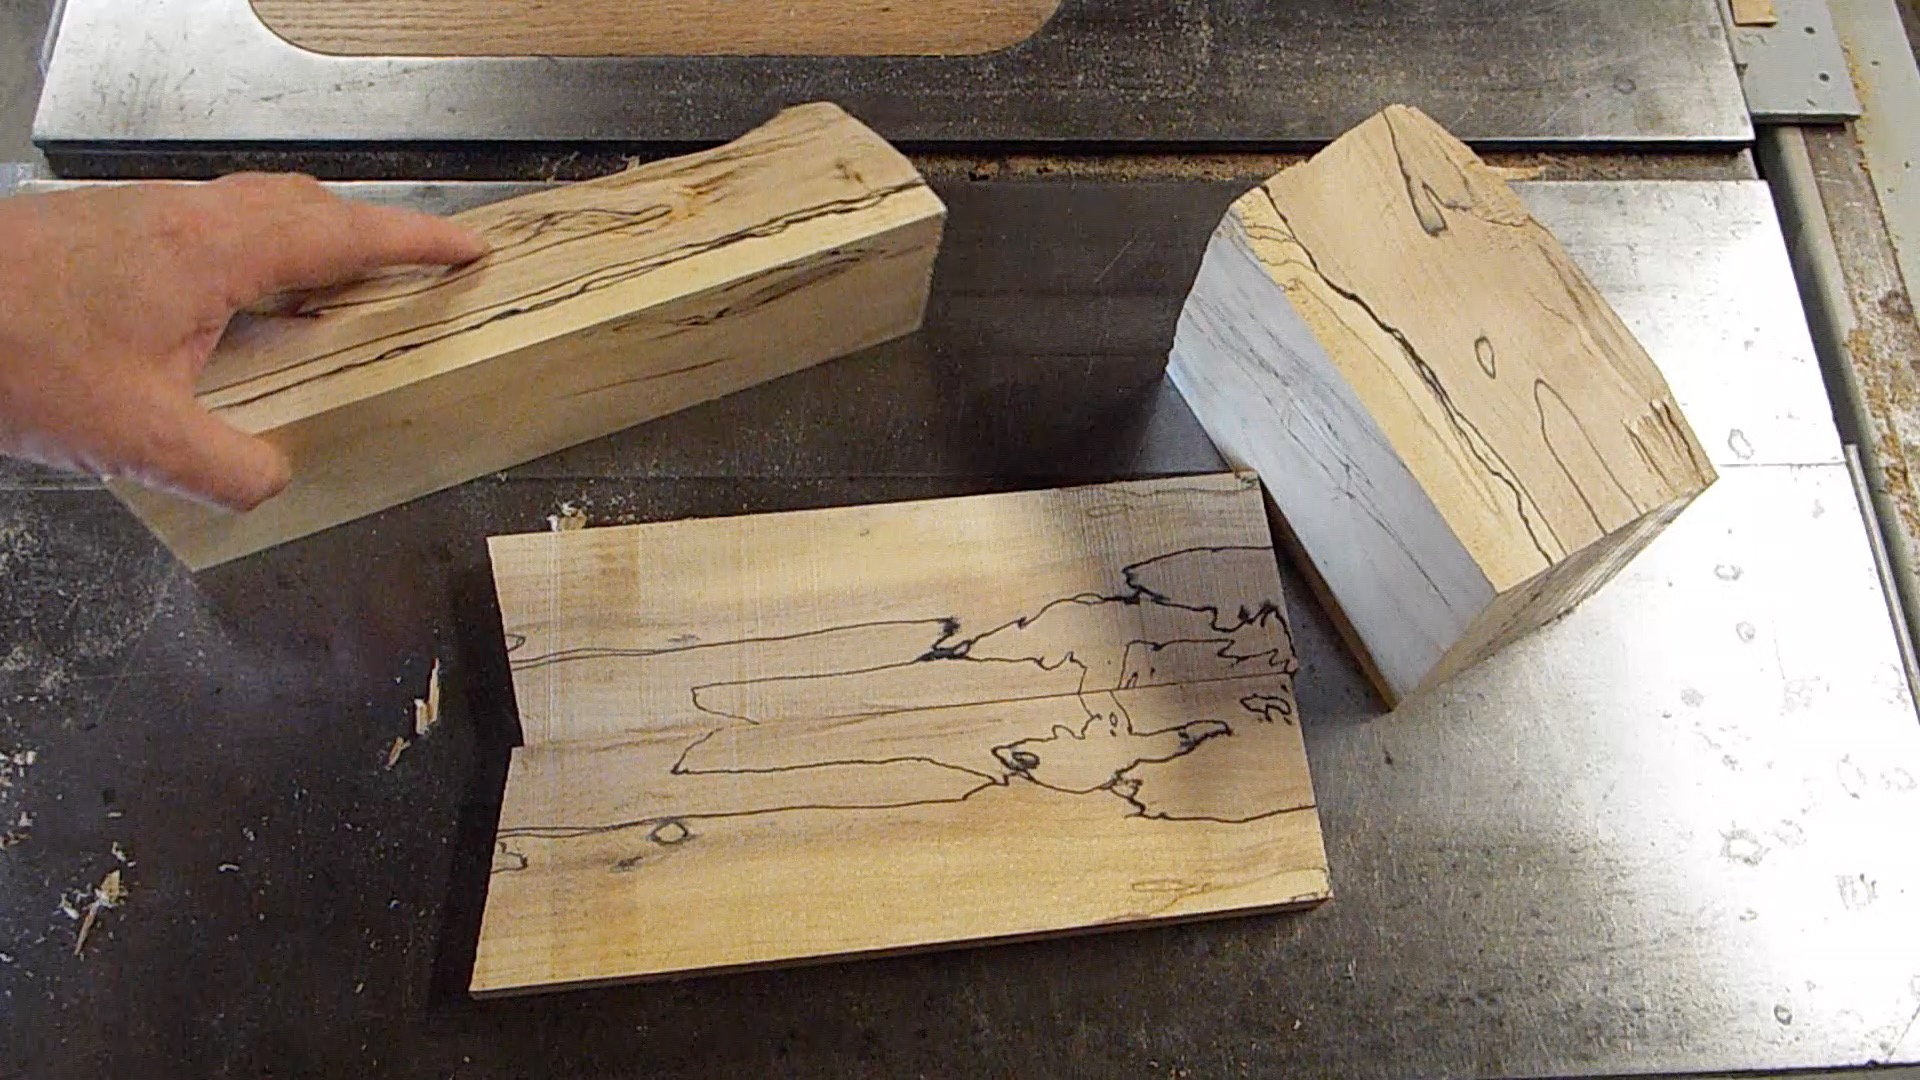
Figure

Figure is usually referring to the grain of the wood. Burls are the the only source oddly aligned grain. Maple seems especially prone to interesting figure or perhaps just shows it off. A search on google images for the word maple and any of these terms will show some of the great variety of figure seen in wood.

  • Ambrosia Maple
  • Tiger Maple
  • Birds Eye Maple
  • Quilted Maple

Spalting

Some woods are prone to spalting, which is part of the decaying process. The wood can become infected by various types of mold where multiple disparate type of mold start to interact. Dark lines form between the colonies which can be quite striking. Maple, birch, and box elder are especially prone to this while the tree is still standing. Spalting can be promoted by taking a maple tree in the spring while the sap is beginning to flow and left in the right conditions.

Result

So in the end our deal winds up with the property owner receiving a bowl, vase, or hollow form as a reminder of the tree. If you would like to see some of the items we have turned you can look in our shop on the site to get an idea of what we turn. I receive a number of pieces of wood which my wife or I can use to turn for future projects. While we keep a couple of our pieces we usually try to sell them at local craft show or on our website in the shop.

Posted on Leave a comment

Children in the Shop

Children have a unique and optimistic perspective of the world that most of us with more years under our belt have lost. Anyone who has watched a child with a cardboard box knows that their imagination can run wild with possibilities as they pretend it to be flying a spaceship or transmogrifying themselves into fierce dinosaurs. Even their line of questioning which consists of a single word, “Why,” indicates the purity of curiosity which most adults have lost. Children build space stations in their mind, forts from furniture, and swords from branches. Their unbridled creativity allows them to see the most amazing scenes which an experience laden mind cannot see.

Zen Buddhism has a concept called shoshin, beginners mind. Children naturally excel at this because they are not saddled with experience. In their inexperience they will not discard and idea out of hand because it may not work or is too inefficient that an experienced person would toss aside. In Mark 10:13-16 Jesus teaches that we must receive the Kingdom as like a child. The Lord knows that we become cynical as we age and that our perspective becomes one which becomes less imaginative and limited by our experience. The wisdom of the world is that no one in power would give up everything for those that hate them. But a child knows no reason that that such reasoning is not believable. A child trusts and looks to their father for all of their needs.

While children have the advantage of inexperience when it comes to imagination, adults we have the capability to transforming imagination into reality. Where a child might imagine a stick as a sword an adult with experience can actually make something that looks like a sword. Or in the case of my daughter, a wand.

Safety
As someone with more scars on his hands and fingers than would indicate a strong grasp of safety, it is crucial to consider safety before bringing your children into the shop. It is one thing to add to your own battle scars in the shop, but quite another for your child. If you want your child to have fun and want to come back they need to avoid getting hurt.

When you introduce a child to the shop you will want to make sure you have all of the safety equipment appropriately sized for the child. For the wand project with my daughter we needed a face shield. When none of the face shields we have fit her we had to head to the local hardware and pick up a new one and then modify it with some parts from a child’s hard hat since I was not able to find one which would fit her. Depending on the project you will want to find PPE (personal protective equipment) sized for children.

  • Safety glasses
  • Ear Muffs
  • Work gloves
  • Respirator

Beyond PPE, you will want to be familiar with the tools and methods you will be teaching the child. In specific you will want to focus on safety aspects of the tools so you are able to notice unsafe practices the child might start using and be able to stop them quickly. Your experience with the tools will also help pick safe spots for the child to stand to avoid debris or off cuts. Avoid using tools you are unfamiliar with yourself when trying to teach a child.

Projects
A few considerations when choosing a project for a child are their interests, attention span, and capability. Select projects which a child can look forward the completed project. A child who dislikes birds is not going to be interested in bird houses. A child who enjoys fantasy books would probably appreciate making a wand. Even though a child might enjoy a doll house (or castle) they are unlikely to have the stamina to hang out in the shop the several days it might take the make. The duration of the project can be adjusted by pre-working parts and bringing the child in for assembly. Children can be fearless to try new things when a parent encourages them, but you need to consider their capabilities. In general children are not going to be able to attain the level of precision required for many projects. Avoid projects which are going to fail if the joinery is not precise or interlocking pieces do not interlock.

Instruction
Presumably you are encouraging your child to come into they shop with you to enjoy a pastime that you enjoy. When safety is not an issue you will want to allow leeway if the child is having a good time. Keep your expectations of productivity reasonable. It is probably best not to work on a project in which you are heavily invested. Especially when they child may need direction it is best to give your complete attention to the child, not your own project. Work on your own projects on your own time.

Since you are instructing a child you will want to keep an eye on their progress. Some parts of the project can be simple and require little more than a starting instruction. Sometimes you will be required to step in and assist or perform a demonstration. As the adult you will need to discern whether a child is struggling because it is challenging or they are just not ready for a particular task.

Another reason a child might seem to be struggling is boredom or exhaustion. Avoid the boring parts of the project (like sanding or finish) especially for early projects. If you feel it really must be done come back after the session in the shop has ended. Exhaustion for a kid does not necessarily mean out of energy, but mentally they are incapable of concentrating on the same task and need a break. Avoid drawing out the sessions in the shop with children too long and err on the side of shorter sessions.

Posted on Leave a comment

Acquiring and Preparing Bowl Blanks

One of the great things about bowl turning is that I get most of my wood for free. Assuming you don’t count labor. Over time I’ve built up a bit of a reputation among friends and family as the guy who will help take down or clean up fallen trees. That means several times a year I spend a Saturday or night after work I get to spend some quality time with my chainsaw. As a reward I get my choice of wood for turning before the rest gets turned into firewood or otherwise disposed.

Required tools
Since bowl blanks cleverly disguise themselves as trees, you will need some tools to before you start hoarding. The saw is the most important tool for harvesting your own bowl blanks, but there is some additional equipment which can make things go much smoother.

  • Chainsaw – Beside the saw, make sure you have files for sharpening, bar wrench, PPE, and consumables (chain oil and gas).
  • Tarp – Bring a tarp to keep chips and bugs out out of the carpet of your trunk or interior.
  • Trailer or hitch carrier – Either work great for moving logs, but keep in mind you will need straps to secure the wood.
  • End grain sealer (with brush) – I use Anchorseal2.

Chainsaw
You will want to get a chainsaw with sufficient power and bar length for the bowls you are interested in turning. Our lathe has an 8″ swing which means just shy of 16″ diameter for bowls are the largest we will be turning. The blanks to reach that size for a standard orientation bowl (not live edge) will need to be slightly larger to start. Then figure that the widest part of the tree is going to contain the pith and discarded. That puts me in the range of about a 20″ bar to get the maximum size bowl I will be turning.

I use a Husqvarna Rancher 455 with a 20″ bar which has been reliable for me. In the winter I have found that I need to let the saw warm up a bit before it reaches full power, which is normal for small engines. In addition to the saw you will need the standard tools for saw maintenance such as the sharpening files, bar wrench, bar oil, and a gas can. You will also want to consider your PPE: glasses, ear muffs, and gloves.

Types of wood
You will most likely want to harvest local wood so it would be good to familiarize yourself with the local species. While it is possible that you will find something not native to your area that was brought in for landscaping, you will mostly be dealing with native species. For the most part you will be interested in hardwoods, but do not rule out all softwoods as I have seen beautiful work in some cedars and even pine root bundles.

You will want to familiarize yourself enough with your local species to be able to identify the woods during the growth seasons by their leaves (which is easiest and most consistent). Though after the leaves have dropped you will still want to learn how to identify trees without having to cut into it if possible. Walnut and cherry have some distinct bark which are easy to identify. Birch is fairly easy to identify also, but not necessarily the subspecies. Those are a couple species local in my area of the midwest. Other types of wood I find especially desirable in my area include maple and box elder. Fruit trees can also be very attractive, such as apple and pear, so keep an eye out for when orchards are being turned over.

Beside the species of wood, you will also want to consider which parts of the tree you may be interested in using for bowls. The trunks tend to produce nice straight grain bowls. Limbs are also usable for bowl turning since they are not subject to the same requirement of not warping as lumber. Burls are odd growths which can be found on trunks and limbs where the grain changes directions and can be quite desirable in turning. Root bundles for smaller trees, usually decorative trees in yards, can be pulled up and cleaned with a power washer, and these pieces tend to have lots of bark inclusions and can be otherwise similar to burls. Another portion which is often overlooked is a nice even crotch, especially in walnut. These can be turned into beautiful heart shape pieces.

How to find wood
Assuming that you are new to bowl turning, you will need to work at developing a network of friends, family, and acquaintances who know that you are on the look out for wood. Until you have built up a steady stream of wood and a backlog of blanks you probably do not want to be too picky. Since you are probably still in a learning stage turning any wood will be good experience, especially to learn the ones you really like and which ones you will want to pass on later. Having a handful of business cards printed up with your contact information, social media links, and your interest in acquiring wood will which can be given to anyone can also make it so people will contact you when they have a tree down. I give the cards to folks I have gotten wood from so they can give them to anyone they know.

When the bow is in the clouds, I will see it and remember the everlasting covenant between God and every living creature of all flesh that is on the earth. – Genesis 9:16

Craigslist
The Craigslist free section is a good place to start after a wind storm. Within a day or two after a storm lots of people will post ads for free you cut firewood. They are just looking for someone to get the tree cleaned up as fast and cheap as possible. You want to be one of the first on site to pick out the sections which are ideal for your purposes, otherwise a well meaning person may show up before you and cut up the best pieces into firewood length. Once the wood is firewood length and not sealed in a short period of time it will check and become useless for bowls.

Tree service
Tree service companies often consider the trees they take down as an expense since they need to take them to the landfill unless they also process and sell them as firewood. If you can develop a relationship with a tree service company you may be able to get them to call you on interesting finds, such as burls or unique trees they need to remove. So stopping by a tree service company may be a way to get a line on some exciting wood. But until you make a relationship with someone from the service it will likely be the least reliable source.

Processing logs into bowl blanks
Once you have acquired some logs you will need to process them into bowl blanks. This process can be intimidating the first time, but will get easier once you have found a method which works for you. I cover my process in the video below. Below the video I will cover a few things that didn’t make the cut for the video.

You will need to setup a location where you will process your logs into blanks. One of the sites picked up some wood I acquired some very large cut offs from some white oak. I use these pieces to hold the log sections as I rip them. This is easier on my back since I do not need to bend over when cutting. It is also a good idea to keep a few off cuts around to help prop the wood in place when cutting.

Posted on 1 Comment

Milling Firewood

He has made everything beautiful in its time. Also, he has put eternity into man’s heart, yet so that he cannot find out what God has done from the beginning to the end. – Ecclesiastes 3:11

8" Grinder
8″ Grinder
The Thursday before Independence Day a post popped up on the local Facebook group about a tool sale. Always interested in a good deal on tools and the fact it was just a couple miles down the road I hopped in the truck to see what was there. There were some nice tools, in fact I picked up an eight inch grinder. What really caught my eye while looking around was the neatly stacked firewood behind a number of tools in the barn. From the ends I could see that a number of pieces of maple were spalted. And several pieces seemed like they would produce enough wood to be usable in smaller projects. Especially pens which Elizabeth has been showing a lot of interest in turning. The woman (and her son) who were selling the tools graciously allowed me to buy some of the pieces of firewood and I loaded them up into the back of the truck.

Spalted Maple Firewood

I brought in a couple pieces of the wood into the shop. Since I don’t have a moisture meter I figured I would try a couple of the pieces and see how they react. I didn’t want to cut up everything and find out they all curl and twist. It turns out it is a good thing I didn’t go too wild milling it all up as there is still enough moisture in the wood that it will cup and twist as it dries. Though there are a couple tricks to deal with that, like microwaving the thinner pieces at lower powers for a while.

Firewood on the Jointer
The first step to milling is getting a couple decent reference edges. For that I brought the wood over to the jointer and removed the blade guard. This is not suggested behavior, but I’ve found when more or less free-handing like this the guard just gets into the way. I started with the heartwood and holding the log so the outer part of the log was mostly level to the bed of the jointer. Next I needed a reference edge 90º to the bottom and rotated the log. This edge does not need to be the entire edge as it is only going to be used as a reference surface on the bandsaw table in the next step.
Rough Reference Edge
So rather than removing a ton of extra material as wood chips I will still get a decent portion of the log as usable material. Trying to minimize waste is essential to getting the most usable lumber out of the logs.

The heartwood of the log does not have any spalting through it so it really isn’t as desirable for my purposes. If you were going to be milling up some wood that you would otherwise not have access to or wanted more of the wood, you could obviously choose to skip this next step. I removed the heartwood by cutting with the log on the rough reference edge on the surface of the bandsaw table. This left me with the remainder of the log having quite a bit of spalting throughout.

Ripping Parallel Edges
I then turned the log 90º to rip the rough edge parallel to the partially cleaned up edge from the jointer. This revealed what I figured would be the case, that a line of spalting would separate the darker heartwood of the tree from an outer lighter sap wood which head been weakened from the mold colonies. I could see some of that along the ends of the logs, but it was nice to see that it would carry through both edges.

Removed Bark Edge
Removed Bark Edge
Removing the bark edge is the next step. This worked out really well since I had tried to make the bottom about as parallel as possible to the outer edge of the log. Since the sap wood was quite a bit softer, not quite to the punky state that some spalted wood gets, it cut very easily. The rest of the cuts I went nice and slow with to get the best cut I could manage, this one was about half the time. The outer edge did not show much of the lines of the mold colonies. This makes sense since the edges will likely not be near the surface of the log.

At this point I have a four sided square log. One of the tougher parts of this step is trying to imagine what you might find within the wood. In my case I took one of the edges and cut about a 5″ portion off the end with the miter saw to make a small bandsaw box. With the remaining section I ripped two small boards about 7/8″ thick in a quarter sawn fashion. This gave me the two book matched pieces which I will turn into a pen box. Additionally I left another piece together which was a couple inches square and about 9″ long, which I will probably try turning either a goblet or candlestick. Some additional pieces were used to make pen blanks for my wife to make some pens.

Usable Material from Log